Graph Skills in GCSE Physics
Love them, or hate them, graphs are a huge part of physics. They are used in cutting-edge research papers and in articles explaining basic science to the general public. As a result of their prevalence in science, teachers love to ask students questions about graphs and they will, almost certainly, appear in your GCSE physics exam.

Contents
What is the point of a graph?
At its heart, a graph simply shows a trend between two variables and answers the question ‘what happens to the dependent variable when I increase the independent variable?’. This sounds simple, but there are a few rules you need to follow and these never failed to trip up my students whenever graphs came up in a lesson or exam.
What do I need to know about graphs for my exam?
To begin with, you need to be familiar with these two definitions:
The independent variable is the quantity we are purposefully changing, usually in regular intervals.
The dependent variable is the quantity in which we are measuring changes.
A memory trick that my students often found helpful is the sentence ‘I change the independent variable’. For the dependent variable, the clue is in the name: it depends on the independent variable.
For example, if I was going to perform an experiment to study the extension of a spring when mass is added, I would increase mass in regular intervals and measure the extension in the spring. Here, the independent variable is the mass added and the dependent variable is the extension of the spring.
Why are these definitions important for graphs? Well, as a general rule of thumb, when it comes to drawing a graph the independent variable is almost always on the x axis and the dependent variable on the y axis.
Plotting data from a table
A common question in an exam is one that gives you a table of data and asks you to plot the data on a graph. While this is pretty simple, you must take care to be very accurate. You know the graph paper you get given in your exam, with the tiny squares? Well, your examiner will give you leeway of half of one of those tiny squares when plotting data and you can lose marks for being even slightly off. I recommend you follow these steps to avoid missing out on these easy marks:
Use a see-through ruler. Position the ruler horizontally and place the 0 cm on the y axis. Find the distance to the x coordinate of your point and slide your ruler up until you reach the y coordinate
Once you have found this, place a dot, not a cross, in pencil
If each small square represents an increment of 1 and your y coordinate is 12.5, try and get as close to the middle of that small square as possible
Take your ruler away and read your graph to ensure your data point is in the right spot (you would be amazed how many of my students went to all this effort only to plot 65.2 at 35.2 by mistake)
Using a pen, then draw a cross through your pencil dot. It is easier to plot a point accurately with a dot first, compared to drawing a cross straight away
Repeat for all the data points given in the table
When finished, take a step back – are there any points that do not fit the trend? If so, is it an anomalous data point or have you made a mistake? Look back at the table to see if that number sticks out from the pattern
Remember that in tables the independent variable is usually written in the left column and the dependent variable in the right column.
A table showing the positions of dependent and independent variables
Independent variable (units) | Dependent variable (units) |
|---|---|
5 | 200 |
10 | 104 |
15 | 51 |
Drawing a line of best fit
Graphs are made to show trends in data. A line of best fit is our way of looking at the pattern of the data and drawing the smooth, continuous line or curve that best fits this pattern.
A line of best fit, therefore, is not a dot-to-dot of all the data points you have just plotted. A common mistake my students used to make is to think that the line had to pass through every single point they had plotted, but this is not the case!
The priority is to draw a smooth line passing close to all the data points. A good rule of thumb is to have the same number of points above and below the line. Look at the pattern in the data and follow that with your line. Remember that not every line of best fit is a straight line. You may have to draw a smooth curve similar to what you might see on a terminal velocity graph.
The first diagram below is the correct line of best fit for the data points. Notice how it does not pass through every point, but has a similar number of points above and below the line. It is smooth and follows the pattern of the data. The second and third diagrams show real mistakes that my students have made in the past when drawing lines of best fit. The second is a dot-to-dot (which has its place in science, but is not a line of best fit) and is therefore not smooth and continuous. In the third diagram, the student thought, incorrectly, that every line of best fit had to be a straight line.
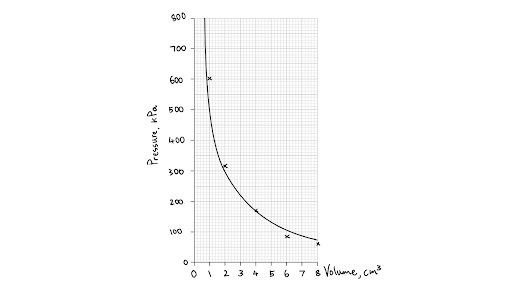
The correct line of best fit for the data
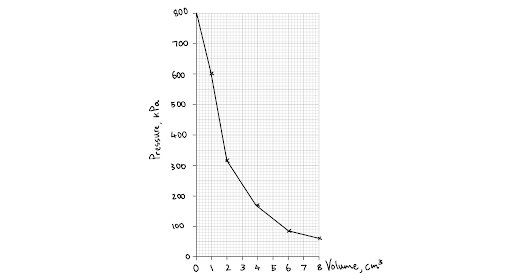
An incorrect line of best fit -it is not smooth
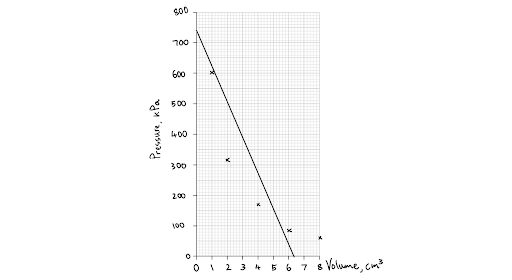
An incorrect line of best fit - it does not follow the pattern of the data
Finding the gradient of a graph
As well as showing a trend in data, a graph can also be used to determine an unknown value by calculating the gradient. Going back to our spring extension example, calculating the gradient reveals the unknown spring constant of the spring. Many of the constants we use today in physics, such as the charge of an electron or the speed of light were originally calculated using gradients.
The gradient of a straight line
Finding the gradient of a straight line graph is relatively simple. Between any two points on the line, this is simply the change in the y axis values divided by the change in the x axis values. But even this method has some subtleties to it. If the two points from which you choose to calculate the gradient are very close together, your answer will be less accurate than if you were to calculate gradient using two points far from each other. There is always a small margin of error when calculating a gradient on paper, and you want this margin of error to be as small a fraction of your values as possible, so go big. If you are a fan of drawing a triangle to calculate the straight line gradient, try to ensure the hypotenuse is more than half the length of the straight line of best fit.
The gradient of a curved line
Finding the gradient of a curve has confused a lot of my students in the past, but we can use some skills from maths to help with this.
You may be asked for one of two gradients when considering a curved graph:
The mean gradient between two points on the curve
The gradient at a specific point along the curve
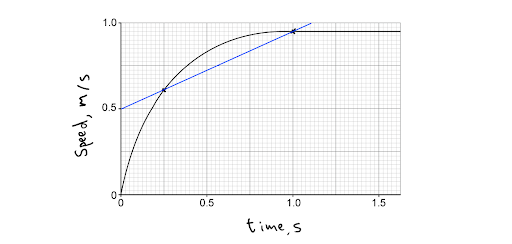
If calculating the mean gradient, all you need to do is draw a straight line between those two points and measure the gradient of that straight line, as explained above. In the diagram below, the mean gradient between 0.25 s and 1.0 s is being determined.
Determining the mean gradient between two points on a curve
When finding the gradient of a specific point, however, you need to find the tangent of the curve at that point.
A tangent is a straight line touching a curve at a single point only
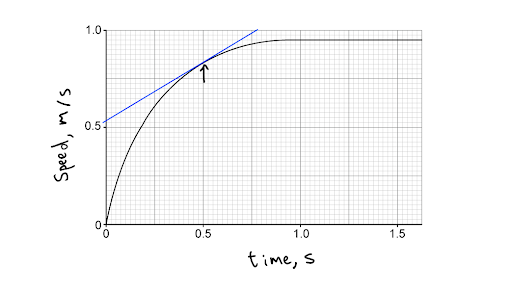
The tangent of the curve at a specific point has the same gradient as that point on the curve. Therefore, if we draw a tangent to a point on a curve correctly, and find its gradient using the straight line method, we know the gradient of that point. In the diagram below, the gradient of the curve at 0.50 s is being determined.
Determining the gradient of a specific point on a curve
Drawing a tangent, however, is easier said than done. A sharp pencil and clear ruler are, once again, going to save the day.
First, place your sharp pencil on the specific point of the curve (be sure you’re on the right point, you don’t want to do all of this just to have to rub it out and start again).
Place your ruler touching your pencil on the convex side of the curve (in the diagram above, this would be above your pencil, but sometimes it may be below) so your tangent sits on the outside of the curve.
Pivot your ruler around your pencil until the region where your ruler meets the curve is centred around your pencil.
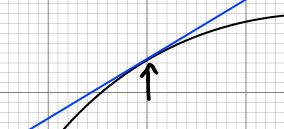
This concept always takes some time to explain, but look at the close-up diagram below and notice how the regions immediately left and right of the point look almost symmetrical about the point.
Press down hard on your ruler so it doesn’t move and draw the tangent very faintly in pencil along your ruler
When you are happy, go over this in pen and find the gradient using the method described above.
Close-up of the tangent to a point on a curve
What topics do graphs appear?
The short answer is: all of them. While some topics, such as motion graphs in AQA GCSE or half-life in CIE IGCSE, feature graph questions more commonly, many exam questions are in unfamiliar contexts. You may be shown a graph of the temperature of a wire at different currents, or wave speed through different densities of fluids.
The great thing about graph skills is that you can apply them to any context and the fundamentals are still the same. The cherry on top, however, is that chemistry, maths and biology also require you to be able to interpret and plot graphs. So, whenever you are practising graph skills, you are getting four for the price of one in your revision!
Sign up for articles sent directly to your inbox
Receive news, articles and guides directly from our team of experts.

Written by Dan Mitchell-Garnett
Physics Content Creator1 articleDan graduated with a First-class Masters degree in Physics at Durham University, specialising in cell membrane biophysics. After being awarded an Institute of Physics Teacher Training Scholarship, Dan taught physics in secondary schools in the North of England before moving to SME. Here, he carries on his passion for writing enjoyable physics questions and helping young people to love physics.
 written revision resources that improve your